[Drew Pilcher] Durable, custom-wound coils with no core needed, and perfectly flat sides. Coils can be wound by hand, but with thin wire and lots of layers to reliably make perfect coils requires some extra help. with pleasure, [Drew] ok shares my method to do this, Perhaps no surprise, the key to repeatable, high-quality coils is good preparation and equipment.
The most important part is the ability to rotate the spool without taking the hand off the workpiece. To accomplish this, what forms the basis of a cheap, unnamed power drill and foot pedal (made from the drill's truncated trigger unit)? [Drew]DIY winder. To make coils accurately, the number of turns must also count. Thankfully, there is a simple solution for this; [Drew] Used Amazon's cheap digital turn counter. This economical device uses magnets and sensors, so [Drew] Simply stick the magnet to the side of the drill's chuck.
 " data-medium-file="https://hackaday.com/wp-content/uploads/2022/06/coils17Lrg.jpg?w=400" data-large-file="https://hackaday.com/wp-content/uploads/2022/06/coils17Lrg.jpg?w=525" loading="lazy" class="size-thumbnail wp-image-540372" src="https://hackaday.com/wp-content/uploads/2022/06/coils17Lrg.jpg?w=250" alt="" width="250" height="250" srcset="https://hackaday.com/wp-content/uploads/2022/06/coils17Lrg.jpg 525w, https://hackaday.com/wp-content/uploads/2022/06/coils17Lrg.jpg?resize=250,250 250w, https://hackaday.com/wp-content/uploads/2022/06/coils17Lrg.jpg?resize=400,400 400w" sizes="(max-width: 250px) 100vw, 250px"/>
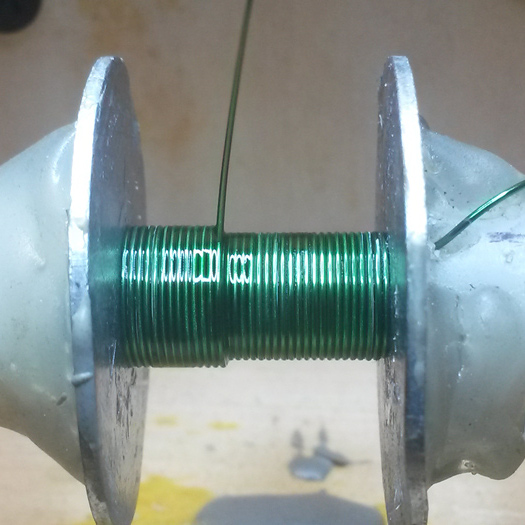
The spool is what the wire gets wound around to form the coil, and will need to be removed from the coil later. to get it, [Drew] Uses brass shafts, metal washers and some plastic spacers. A light coating of grease on the spool surfaces helps ensure that things separate properly at the end.
To actually make the coil, [Drew] Recommends some means of magnification and a supply of CA glue. Wind the wire as neatly and closely as possible, and apply CA glue during the process to secure things in place. This takes some practice, but really clean winding is possible if done correctly.
For thick coils with lots of layers, ca glue will hold things together nicely, but for smaller coils [Drew] Prefer giving them a final coat of two-part epoxy. After things are all set, the spool is detached and the inner core is pushed out as gently as possible.
Result? A tightly wound, durable coil with perfectly flat sides. That is pretty much it [Drew] Your upcoming coil gun project needs you. How's that work, you wonder? You can see the basics covered here,


0 Comments